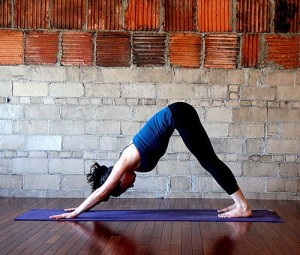
Downward Facing Dog
Downward dog
The downward dog is one of the most widely recognised yoga poses and has much to offer any
athlete, especially those involved in running or high-impact sports, where tight hamstrings and
spinal tension can impede performance. However, as well as stretching and strengthening the body, this pose can also be used to rejuvenate and invigorate the body, as part of your warm-up and cool-down, and for recovery between training sessions.
Benefits
●Lengthens and releases tension in the spine;
●Releases tension around the shoulder blades;
●Stretches the hamstrings of the rear thigh, gastrocnemius muscle of the calf, and the hands;
●Strengthens the ankles, frontal thighs, shoulders, arms, wrists and the core muscles of the trunk;
●Anecdotal evidence suggests that the pose can improve digestion, relieve back pain and fatigue, and some athletes report that it can also help to calm the mind and relieve stress.
Step by step
1.Start by kneeling on your hands and knees on a non-slip surface, without socks. Place your hands shoulder width apart, a little further forwards than your shoulders and your knees underneath your hips. On an inhalation, lift your hips up towards the roof and, on an exhalation, lower your heels gently towards the floor, straightening out your legs.
2.Check that your fingers are spread apart and the middle fingers face forwards. Press your weight firmly through the inner wrist, base of the thumb and forefinger. Spread your weight evenly through your hands and feet and move your chest towards your thighs.
3.Lengthen your spine by pressing your buttocks upwards, while lengthening the crown of your head towards the floor. Tuck in your chin and gaze towards your navel or knees. Draw in your abdominal muscles towards the spine.
4.Once you have reached the maximum extension of your spine, draw your attention to lengthening your legs. Don’t lock out the knee joint but work sensitively on opening the back of the knees. Press backwards and downwards with the heels to achieve this. If your heels easily touch the floor, step your feet further away from your hands to create more of a challenge.
5. Ensure your feet are hip width apart and parallel, with toes pointing straight ahead. To get a real sense of extension through the backs of your legs try lifting your toes a little off the floor.
6.Create space between your shoulders and ears by externally rotating your shoulders, ie.,turn your hands so that your fingers now point out to the sides and then spin your hands back to their original position without turning your arms back. Relax your head and neck.
Building up to the pose
This is a challenging posture for beginners, so start by holding for a short duration of 5 to 10 breaths. Come to rest on an exhalation by lowering your knees on to the floor and resting your buttocks back to your heels. If your wrists feel sore after the pose, come to rest in a kneeling position and relieve this tension by circling your hands in both directions.
Gradually build up to holding the pose for a minute, breathing deeply in and out through the nose. Don’t be too concerned about how close to the floor your heels can stretch; you’ll feel an ‘opening’ sensation along the backs of the legs regardless of where the heels end up. If you concentrate too much on stretching the heels down, it’s easy to forget to fully elongate the spine, so try to achieve both effects (although it is a compromise). Try closing your eyes to really get connected with the sensations that downward dog creates. Allow your breath to be slow and calm and work as sensitively as you can into the stretch.
Exercise tips
●For greater stability, try elevating your heels against the base of a wall, or take your thumb and forefinger against the base of a wall.
●Beginners and those with really tight hamstrings or restricted mobility about the shoulders should try bending the knees a little or widening your feet stance beyond hip width.
●If you are using the downward dog as part of a warm-up, try ‘walking out’ the legs, alternating a bend of the knees, or as you inhale, lift on to the balls of the feet and as you exhale, lower the heels back and down towards the floor. Repeat each of these movements several times before coming to stillness.

